Sometimes I just need to try strange things out.
Friday I experimented with a blue filter, a purple filter, green, pink, orange, yellow, and brown.
I put them on the infrared camera and had some fun results
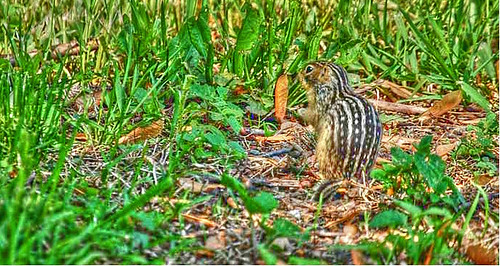
Brown:
As expected with a brown tint straight out of camera.
Edited:
Pretty interesting!
Green:
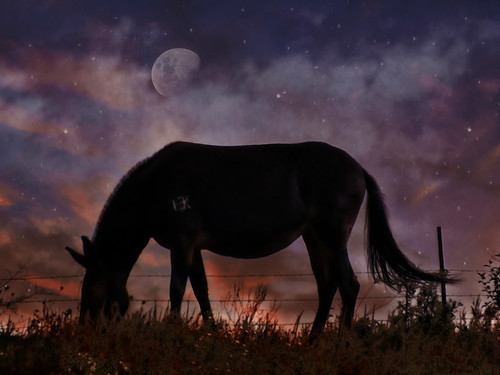
Well that is different!
First edit:
Second edit which involves layering a 'painted' image over the this layer and using a Luminosity layer at about 30% to add color and pop.
Now...I like that! It appeals to my sense of wild.
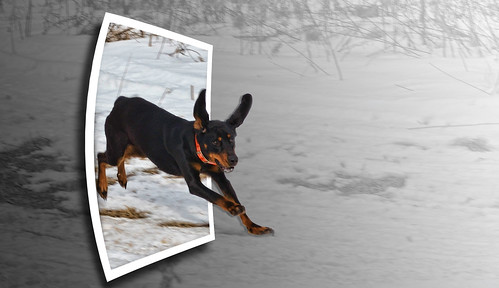
Next: Pink
Meh.
First edit:
Second edit:
I dropped this into Paint to Picture by Corel to add a bit of pizzazz. Well, I left it as the 'painting' as I liked it so much better!
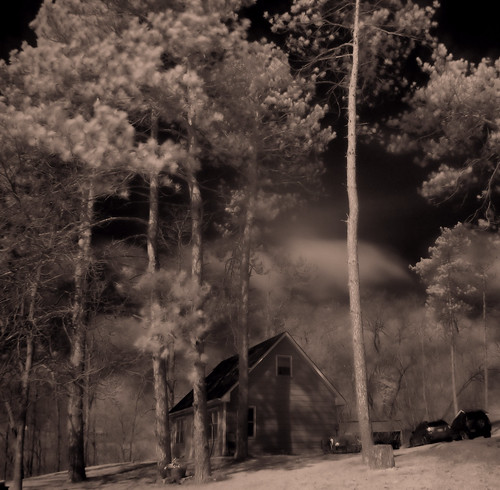
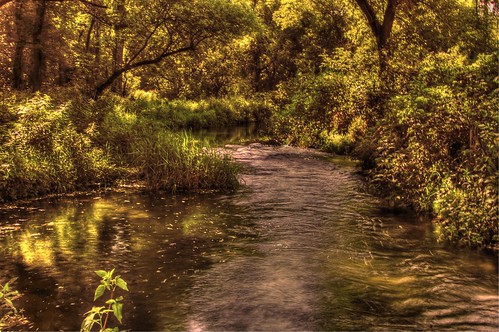
After some other failures and successes, I decided to go with the Blue Filter and see what would happen.
I got two variations with minimal editing.
This first one is my favorite and what I have been yearning after with doing IR!
This is Thor's paddock now taken apart and dismantled except for the gates to take him in and out.
This is a shot I do over and over again in different light to try and understand how different times of the day effect the IR filters.
Here are what the filters look like:
And there you go.
Having fun with colors!
Showing posts with label Corel AfterShot Pro. Show all posts
Monday, September 02, 2019
Sunday, September 18, 2016
Taking photos/Random Thoughts
Of course there will always be the debate about how much editing is acceptable.
There will always be a huge debate.
To Edit or To Not Edit.
I am somewhat in the middle. A little editing can go a very long way.
I like to take .RAW files now. I can breeze through them in CorelAfterShotPro 3 and get a good job done quickly. I guess I am plugging Corel because they haven't gone the way of Adobe where you have to pay monthly to use Lightroom and CC.
I've also found ON1 to be extremely easy and fun to use.
It has the ability of taking my .ORF and my .NEF files and working with them and I can save them in a variety of file types.
However, I am always interested in improving what I do. I read up on tutorials and watch the occasional video.
One of the items I see floating around the internet is videos that teach you in certain programs of how to change the sky in your photo that you've taken.
Yikes! Okay, that is fun and it can add a lot of drama to a photo.
But when did we stop taking real photos? Or better yet, why do some folks post edit photos and spend more time on them in the digital dark room than they did thinking about taking the shot.
I've harped on this before. And I am as guilty as the next person for post editing shots. And perhaps I am all wrong too...
I have learned a few tricks that could help me get a more interesting shot than the conventional way. But swapping out skies seems a bit extreme for me.
I don't mind cloning out a small distraction, but going to the far end of the spectrum is a bit unrealistic.
So I don't know if I'd qualify as a purest ~ no, I am not. But I won't spend hours swapping skies, cloning in or out rocks, and other items on a photo.
I think about what I want to do, watch the weather for a perfect sky and then try to compose something that will work.
Here is an edit that is very obvious.
Here is another. Replaced sky added a moon, but it is all quite obvious.
Here is a shot I took a long time to think out and do. I took many shots on a beautiful morning. I used an Infrared filter and also did some shots with a ND filter.
I came up with this, edited to black and white.
[This shot was taken obviously before our house remodel.]
I like to do less as more.
I studied the lighting in this shot and went with what filtered through the window in the late evening out onto the porch.
I've done some pretty wild stuff, but always seem to come back to the basics.
I even once in a while go a bit overboard in exploring things like HDR.
Recently I've gotten an interest in bugs. I've read up on how some of the professionals get great 'insect' shots and learned about something called Image Stacking. Image stacking led me to Focus Peaking and searching out how to manual focus properly in an Automatic Focus world.
I'm making the circles. Landscapes, Macro, Panoramic, High Dynamic Range, Long Exposures, Still Life, and Infrared Photography, a bit of over the top artistic stuff, and then back to the basics.
All challenges to make taking a photo interesting and challenging at the time.
Edit? Of course. Have fun with it.
After all when the debate dust settles, I guess it all comes back to the photographer and what the Artist Photographer wants to portray.
I guess if you are going to take photos, you just need to enjoy what you are doing.
Tuesday, January 12, 2016
Thoughts on Photography
I used to claim to be a purist. But that was when I faithfully took film shots and left it up to the lab to do my printing.
Along came the digital camera and I was not not not going to go there.
But in the end I gave in and got a little point and shoot digital Olympus Stylus camera. And the digital age took me by storm.
And then I acquired my first Photoshop program to learn with. Photoshop 7.0.
I enjoyed working with the program and becoming creative with it.
But I still wanted basically to remain true to the photo.
Now you can get Adobe Lightroom $9.99 for per month.
Adobe CC their slogan...Take It/Make It. Software for rent.
The slogan they have bothers me a bit.
Take It/Make It.
I think it gives the wrong message to budding photographers.
To me it says, take the photo, 'rent' our software and we can teach you how to make a great photo.
But is it a new normal for photography?
Granted you do need software to make .RAW files into .jpegs or other useful files.
I also don't buy into the fact that you cannot take good photos unless you have the Industry Standard Photo Editing Software or the most expensive lenses and most expensive cameras.
However I suffer camera envy and lens envy with the best of them.
Whatever happened to learning to use a camera and exploring its capabilities first? The internet it full of online photography classes.
How to edit your photos into a masterpiece!
Learn Photography, a Tutorial!
I will also say that yes, I do use editing software. But I go for 'the shot' and try to make it as correct as possible first and not afterwards.
I take it and then may have to touch it up.
Original
Edited to take out the noise from the long exposure on the moving water in this shot.
ISO 200
f/20
60 second exposure
Olympus E-420
ND filter
I most certainly didn't need that long of an exposure and could have done with a slower one, but the ND filter was a 10 stop filter. Very dark. I could have gone with a lighter one, but the sun was so bright and I enjoy seeing how far I can push exposures.
The shot itself is not one to write home about. I was trying to get the rocks and the ice crystal clear and allow the water to be ultra smooth. Instead I 'sort of' got it.
I assume if I spent enough time working on this shot, I could enhance the ice and the rocks. But this shot doesn't shout at me as being that great.
So I passed on spending hours in a software program making a great photo.
I plainly missed hitting the mark on this shot.
More than likely if I'd not gone with such a long exposure I would have gotten something much nicer.
Here is another shot I took with a Sanyo Electric Co., Ltd S1413 pink point and shoot camera. I was walking along the snowmobile trail and pulled the camera out of my breast pocket and choose Landscape as the setting.
And simply, I really liked the composition of the shot.
Of all the shots I took that day hiking in and out of the valley, this is the one I think was my best.
This was my the second shot I took in a portrait view to catch more of the sky, but I like the first one better.
Then there was the neat ice formations.
So I passed on spending hours in a software program making a great photo.
I plainly missed hitting the mark on this shot.
More than likely if I'd not gone with such a long exposure I would have gotten something much nicer.
Here is another shot I took with a Sanyo Electric Co., Ltd S1413 pink point and shoot camera. I was walking along the snowmobile trail and pulled the camera out of my breast pocket and choose Landscape as the setting.
No editing other than the water mark.
Then I did take it to CorelPaintShopProX7 and used Topaz BW Effects 2 to get this.
ISO 100
f 7.2
1/1166 seconds
No filters
You guessed it, I am guilty of 'making' a dramatic black and white shot from a color shot.
The difference here is that I knew the capabilities of Topaz BW Effects and as I looked at the scene in front of me, I thought of how it would be composed in black and white.
I didn't just shoot a random shot. I knew how the clouds would add drama against the blue sky when I shot it.
I knew from old school film that in black and white photography the red filter would whiten the clouds and darken the blue sky.
And simply, I really liked the composition of the shot.
Of all the shots I took that day hiking in and out of the valley, this is the one I think was my best.
Then there was the neat ice formations.
Unedited
Edited to show details and cropped
Thursday, July 09, 2015
One photo, 3 edits
Here is the original photo. The road presented with a nice curve to the tree and to the clouds above. So I stopped the car and stepped out to take the shot.
This is a road that I travel often and it is a route I take home. I noticed the really fantastic sky while driving home from picking up my new glasses.
So I thought about how this road appears to go 'nowhere' and right into the sky.
I used Corel AfterShotPro to for my RAW processing. I don't always shoot in RAW because it often entails an extra step or two to process a shot and sometimes I just feel lazy. But since this was a sky shot, I wanted to be able to deal with bringing out the clouds a bit better, the shot in camera was pretty dull.
Most people use Adobe Lightroom, but I like the fact that I don't pay a monthly fee to edit my photos. I also think this product for me is much faster.
I then edited this shot with Topaz Adjust 5. I added a bit of detail, enhanced the clouds and reduced some noise.
Now this is a bit more fun and exciting. More of what I saw in my mind's eye when I was taking the shot.
I was also thinking of how nice it would look in Black and White.
So I used Topaz's BW Effects to process the photo.
My photo editing software is now Corel also.
I made the change because again, Adobe which I've used for years is now a monthly fee basis for photo editing. I suppose I could have gone with the latest Elements, but the price comparison was not even in the ball park with Corel's Paint Shop Pro X7.
Whoops, I didn't mean to make this sound like an ad for either Topaz or Corel, but since I am talking about editing, I thought I'd let you know what I am using to get to these points.
There are also some fantastic on line editors as well as free editors that you can download. I'll have to do a separate blog for that.
Here is the black and white version:
I feel that black and white added a lot of drama and punch to this shot.
Then I decided to do something I haven't done in ages.
Add a texture layer and edit the black and white version to look as though it had been carried around in someone's wallet, and dropped a few times on the ground.
I thought it would be fun to see what it would look like 'aged'.
And here is the 'aged' photo. It feels like it has some character to it.
And so there you go. From my 'vision' in the car to my vision digitally 'remastered'.
Textures Created by Jerry Jones:
AUTHORIZED DOWNLOAD SOURCES:
You can download them FOR FREE at:
http://shadowhousecreations.blogspot.com/
My Official Blog.
You can also find some of my textures at http://www.flickr.com/photos/skeletalmess/
My flickr page.
Wednesday, February 13, 2013
The AF-S Nikkor 50mm f/1.8G lens
It came on Monday late in the afternoon ... after the town truck dribbled sand on the 'brown' ice.
So I gleefully attached it to my Nikon D3100 and decided to take some test shots inside the house with Morris as my model.
What I've learned from this, is that I need to move around for the best shots. I can't just zoom in and forget it.
This shot was taken with a flash [dark in the house]. But it clearly gives me a fairly crisp shot of Morris's face and gives me a nice 'bokeh' for the rest of the photo.
In the above shot, I wanted more items in focus. I simply moved back and focused on the dog. I read the f stop ~~ f5, which gave me a slightly larger field of focus.
The first shot was done at f1.8, so you can see the change in the depth of focus.
Next test was outside. How would it do? Since it is labeled by some as a great portrait lens, I wanted to try it out and see what it would do...
So I set the f stop to 5.6 and got this of the road:
The image looks nice and crisp to me.
Next Morris and Dixie started to play and run along side the road.
I put the camera in program mode and pointed and shot quickly hoping to get something I could use.
The camera chose f 6.3 and I got this photo.
These shots were done in RAW format, edited in CorelAfterShot Pro [30 day trail] and I used Topaz Adjust 5 to enhance the shot of the dogs for just a bit of exaggerated detail.
I'm pretty sure this lens is going to serve me well. I need to practice of course to see what its limitations are.
But I'm thinking that this lens could prove to be a handy one to have when photographing wildflowers in the woods and fungi.
It is a fast lens.
Saturday, February 02, 2013
Impressions of Corel After Shot Pro
I decided to look into Corel After Shot Pro and see how easy it was to work with.
I read and read and...read reviews about Adobe Lightroom 4 and how sometimes it was a bit slow and clunky.
Corel offers their product with a 30 day trail and an attractive price of $59.99 at the moment.
I found that I can shoot RAW files with my Nikons and my Olympus E420 and quickly edit them in a batch.
I did all these photos as a batch with different settings and then sent them 'off' to be turned into .TIFF files to work with later.
The 'development' of the files took less than 4 seconds.
Okay, I was happy about that.
The program edits the RAW files but does not change them. I even made 3 versions of one .RAW file [all saved quickly into fine quality .jpegs ~~ not shown here].
Now I am not a techie, nor have I tried Lightroom 4, so I may have to really give that a go too.
The only camera that I have that isn't supported by Corel AfterShot Pro, was my Fuji camera with .RAF files. No matter I can live with that small inconvenience, Corel may update their program to include it at a future date.
There are some fun features in this program that allow you to experiment with your photo. The only drawback I can see is that you cannot add a watermark while working with them. That is not a real big issue for me though.
The above shot was off color due to the bright snow, I did a quick check with the 'white' picker in Corel AfterShot Pro and bumped the saturation. That was it.
You can also do non-destructive editing in layers. Well, I haven't figured that out yet. I've only been using it for 3 days.
The black dog in this photo was totally blown away yet I was able to save her image. I used Corel to properly expose and bring back the black blob of a dog...then I easily sent it to CS2 to use a Topaz Plugin to finish it off.
Lastly. Speed.
Speed
Speed
I loved this program's speed!
As did my sidekick, Morris.
Labels:
.NEF files,
batch edits,
Corel AfterShot Pro,
ORF files,
photography,
quick edits,
RAW Files,
snow,
walk
Subscribe to:
Posts (Atom)