I started doing photography and felt that every photo just had to be perfect and straight out of the camera as I saw it.
I joined Flickr and started seeing other photographers doing editing and other things to photos, I met those who did abstract computer art, and... suddenly my world started to expand.
I began to learn the basics photoshop, GIMP, and other programs. I tried most anything I could get my hands on. Yesterday I came across something in my searches called 'Paint with Light Effect'. I decided to check it out.
I'd done Painting with Light at night and had a lot of fun. However, I don't often go out late at night and do photography.
It has been fun, and so I wondered what this new Painting with Light was.
However, it was not what I expected. It was painting light within a photo to dramatically change a photo.
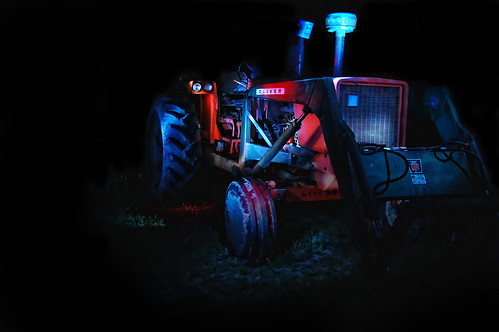
I happened on something called the Briscoe Lighting Effect.
Tony Kuyper covers this in his WordPress blog and has a short video regarding the method that uses CreativeSuite by Adobe. I can't afford the CS by Adobe and I don't like 'renting' a program and paying for it monthly.
I started using ON Photo, the free version after Adobe went to a pay monthly fee. I kept my version of CS2. I eventually went for ON1 RAW and I like the program. I own it and can upgrade if I want. It is a bit easier than CS, but it is not as creative.
All that gobbledygook aside, I thought I'd take some techniques and try to use them in ON1 RAW.
Here is the original photo:
Pretty boring isn't it? This is not what I imagined it to be as my eye saw the sunlight just barely coming in from the far side of the stream.
I also wanted the photo to have a dreamlike quality to it.
After a lot of missteps and start overs, I stopped here. Yes, this is what I wanted.
I edited the specific colors in the far end of the stream. I also used a texture layer to darken the sides and one more cloud layer to put the reflection of the sky in the water.
It isn't realistic, but it was something I saw in my mind's eye when I took the shot.
Here is what the ON1 editing program looks like and why it is SO easy to work with.
No, they do not pay me to talk about their programs.
I'd met someone recently who had told me how lost she was when using CS/Adobe Elements and layers.
Here is ON1 with the same photo, but I am editing it to be a black and white photo.
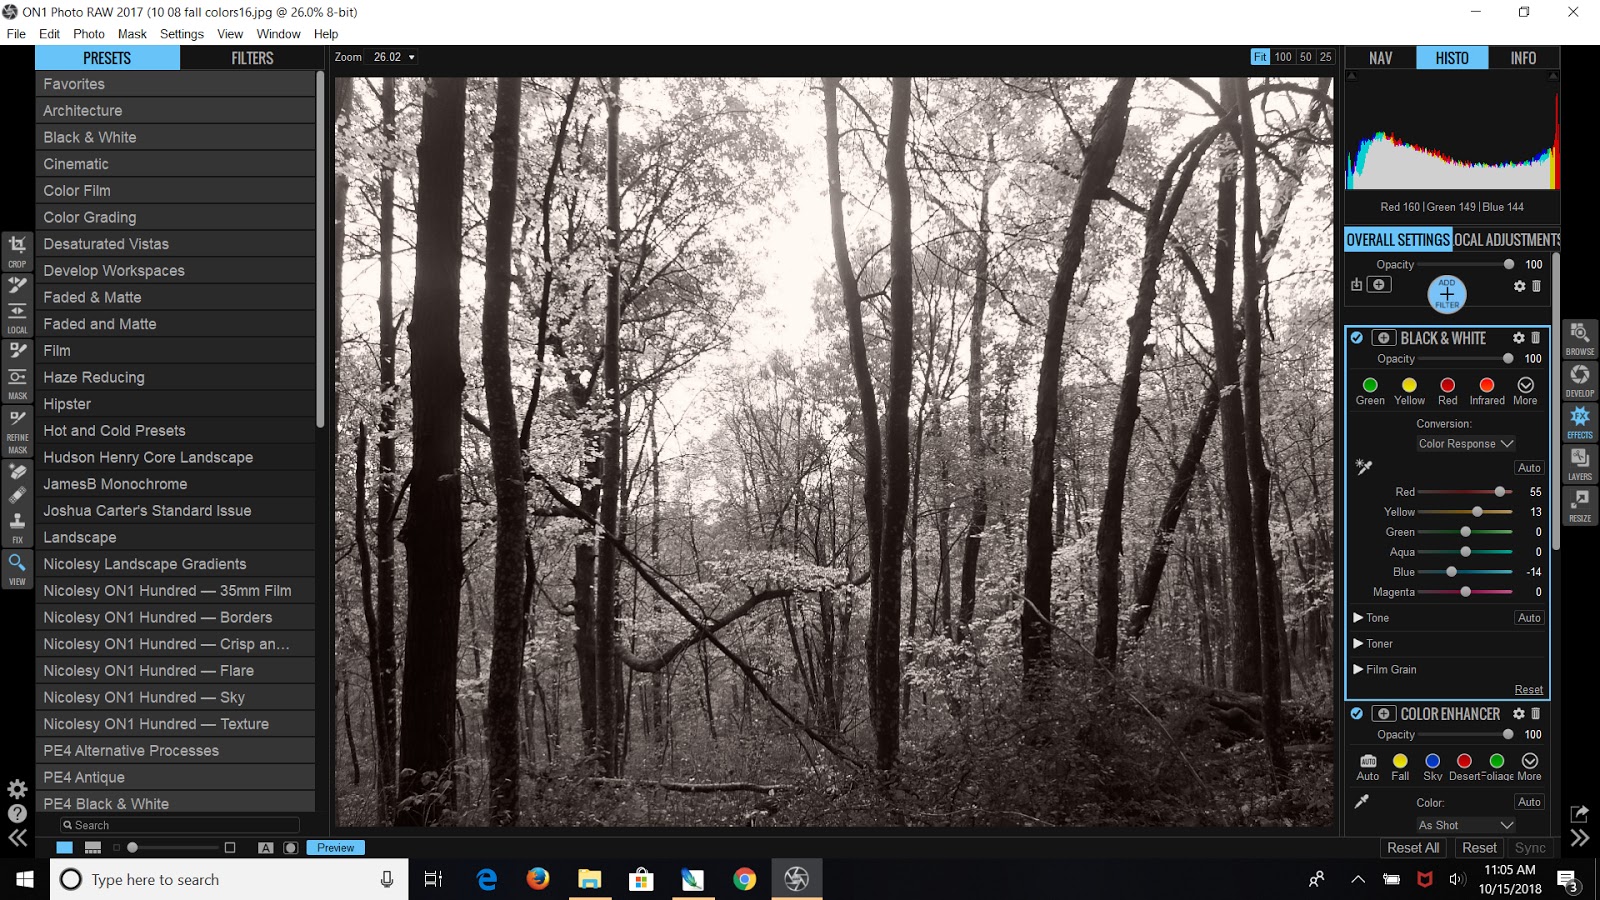
The original shot was pretty unimpressive too. But I wondered how it would look transformed in Black and White. I brightened the yellows, the oranges, in the color enhancer and then shifted it to Black and White and played with the sliders.
Besides ... X marks the spot.
I took this next shot and of course did some more play with it.
Color:
Sigh. It is nice but...
Black and White:
The leaves stand out in this shot, where they really didn't in the color version.
Next up?
I watched a video on how to composite a fantasy scene.
I will have to use both ON1 and CS2 for that. It is a great challenge.
Showing posts with label ON1RAW2017. Show all posts
Monday, October 15, 2018
Friday, October 06, 2017
Some fun with Photos...
I've tried just about every photo editing program out there. I tried Light Room and loved Photoshop 7.0 the program I learned on. I didn't have formal training but learned it by the seat of my pants.
I tried Light Room and even though it is a masterful program I didn't like the fact that Adobe had you rent that and rent Creative Cloud to stay 'up' with the program.
One day I ran across a program called ON1 Effects. I downloaded it and actually enjoyed the free version for about a year before I invested in purchasing the ON 1 Effects version. I found myself using it a bit more and more and withdrawing from the old Photoshop CS3 I had. I also drifted away from Corel PaintShopPro.
Last year ON1 announced a RAW processing program that they were developing.
I dove in headfirst. If you look them up and find discussions regarding the program there will be comments about the glitches, the crashes, and the program issues.
However.
Even with the problems I've encountered, I am loving this program.
If I am to do some extensive edits, more creative art stuff, I sometimes go back to PS.
Well, perhaps I did. I would have gone to the old Creative Suite to do this, but I decided to pursue it in ON1.
I've found it the go to program for my IR shots too.
This is what the interface looks like.
This is the original Infrared shot.
This is the final outcome. I've worked out a workflow that really works well for me.
Some things I don't like. Using layers seems to crash the program often. Working on too many files seems to crash things. Some of it involves my RAM memory and my CPU and other technical things. My laptop is not the newest one out there.
Sometimes when you do extend beyond just the regular shots like adding filters and infrared, you do need a processing program to work with. IR would not look half this good if processed through an online program.
Here are a couple more I did that day ... while on a walk with Morris.
This shot of the cosmos is one I wanted to do in the same fashion as the Sumac leaves. I laid in the garden and shot upwards towards the cloudy dull sky to take the photo of the flower.
And I wanted and etching.
Or something like that.
This weekend, I hope to get out on some cloudy and rainy days to do some beautiful fall photography. Jersey Valley should be incredible.
Labels:
editing,
edits,
etching,
Infrared,
IR Photography,
messing around,
ON1 10.5,
ON1RAW2017,
photography
Wednesday, February 22, 2017
ON1 10.5 and ONRAW2017
I'm always looking for ways to touch up a photo in a fast an easy sort of manner. I don't like wild over editing, although I will plead guilty to doing it when I feel extremely creative.
I discovered ON1 Effects Free a year or so ago and installed it. I enjoyed playing around with it and then tried the 90 day trial of ON1 10.5. I found I was able to take .RAW files and edit them in the 10.5 version and I really enjoyed the ease of use.
When my 90 days were up, I bought the program.
This was a photo I did in 10.5:
I am not a huge fan of photographing buildings, but each year when I go to the Range to practice for work and Qualify, I go past this church.
I happen to really love photographing this little building.
I thought a vintage look would be fun.
So yes, this would be 'over-edited' but for my creative juices only.
I also sometimes like to work in layers. Imagine how pleased I was that I could layer and mask easily in both ON1 programs.
I normally wouldn't be altering a photo like this and adding extra textures to it, but I thought it would be nice to show how easy it really is to do in ON1.
Here is the original shot.
And then the peeling paint texture added:
I used "Overlay" and lightened it a bit in a layer above the photo, then use a handy little Bug Tool to keep the cup and beads from having the texture.
It was an interesting experiment.
Seriously? I like the plain and straight forward photo myself.
However, this series of edits only took me a few minutes to do. Which is the beauty of this program.
I also didn't have to take hours of Photoshop courses in order to learn how to do it.
I did review how to use this program from a few "Short Clips" from ON1.
I have to admit, I do enjoy being able to be more 'creative' with ON1, at least I can do it all in once place and do it quickly.
I absolutely adore how I can edit my Still Life work.
Tuesday, February 07, 2017
In the works, Still life/Night Life
This is where I work. I decided to try a pretty cool thing that comes with the Olympus OMD E M5 camera. Live Time. So I used a little tripod and pushed the button and...watched the photo appear on the screen.
Way cool.
I added some star specks and the little moon. Original is below.
This is a dam on the Mississippi River taken from a wayside.
Meanwhile I thought I needed a do over of some rose petals and rings. That didn't turn out so well so I went to plan B.
I did another ring instead and it looks like I'll have to redo this one also.
I blew the whites but I'm getting closer to what I want. I'll have to get another batch of flowers with roses in them. But, not until after Valentine's Day. They will be too expensive right now.
Well I decided to move on and try some other things.
Here I am doing the thinking pose while I toss around some ideas in my head.
I grab some items together. A vintage ruler, an old pitcher that I picked up from a flea market, a white rug, a ruler with advertising on it from the 1930's, and some flowers that were past their due date.
Fred would be very happy I think. Fred Flatow that is. I think that was his calling card in the 30's. On the flip side is a handy little ruler. Pretty neat right?
Finally I get something I am happy with. For fun I tossed the Lego Man into the coffee in the cup, along with a flower.
And I liked it better than any other shot I'd taken today.
And thus was born the Lego Man in the coffee.
I finished off the photo 'shoot' with two last items.
I wanted to go out and shoot the cropland and the icy sculptures in the moon light but alas.
The clouds have moved in.
Tomorrow is another day and hopefully I get out to do some more night photography soon.
Photos developed in ON1RAW2017.
Thursday, February 02, 2017
Still Life while the winds blow!
If you think I have a fancy studio for some of my still life work. Think again.
I do have a room now that I can gather my stuff together and leave it while I get distracted for something like, um, let's say, doing chores, making supper, or going hiking.
My go to backdrops are made out of simple cardboard, an old tablecloth, an old rug, and sometimes some velvet scraps I've had in my sewing stuff.
I have a bowl of beads and old fake pearl necklaces and other items that I toss into the mix. I bought a mix of flowers at Walmart that was a bit past its prime. The rose petals began to fall from the flower and I thought the petals were a perfect addition to what I was working on.
I have done most of my 'work' using the existing light from the bedroom window. On cloudy days the light is very subdued and on sunny days it is harsh in the afternoon.
I used a fold up chair and some black velvet for one shot. I leaned some black cardboard up so the pale wall wouldn't show when shooting the rose petals.
After I was done I realized I didn't have the perfect focus so this one really didn't make the 'cut'.
But the concept was nice. I did use some heavy handed editing to remove the dust and grey portions of velvet that showed up in the photo. I used the Perfect Brush in ON1RAW to help with that. What a handy and quick tool it is.
Before brushing...
Next time I try this I would like to have everything in much better focus.
I did end up with a very nice shot however after trying a few other things.
And....
Edited version below with texture from an abandoned building.
Arranging Still Life is still a mystery to me sometimes and I often don't spend a lot of time making an arrangement. It seems to work better if I don't think about it too hard.
So while the wicked winds blew outside, I was in the spare room playing with items.
My husband says I have too much time on my hands. He may be right this week as I was off for his surgery that got cancelled. However I did sell a piece of artwork so I guess it wasn't a complete waste of time.
And then there is my small skull collection...
Opossum in the middle and ground hogs on the outside.
Monday, January 09, 2017
Can't go out to play so...
So I thought I'd get out the bathroom mirror that I saved for whatever reason when the guys gutted the bathroom.
I thought it would be fun to use them this winter in some of my Still Life work.
Again, this was an easy set up. I put the mirror down on top of a plastic tote and then simply began to arrange things around.
The egg was a wild idea. Yes, it is a raw egg and no, there was nothing holding it in place. It looks like the egg-s are suspended.
Rich wasn't feeling good so instead of taking the hike at the Kickapoo Reserve to see the unfinished dam, I decided to stick around the house.
I got out some of my cups, rings, and baubles and arranged them in different manners. I didn't use any other light than that which came in from the window behind me.
I would love to do some light experiments soon though.
I used old necklaces and other items I have in my 'junk' box. I used a doily I found at the flea market as a backdrop along with an old white table cloth.
The silver rings and ribbon came from a wedding invitation that my daughter in law made. Yes I sometimes keep odd things.
And not all are keepers. The photos were okay, but didn't really have any zip or WOW factor.
And then I did this.
And it made it worth it.
I was happy that I stayed inside and didn't go out ... to play.
Monday, January 02, 2017
New Year's Day Hike and ON1RAW2017
New Year's morning came in just like any other winter day. Except we hadn't gone out the night before. We aren't the party type any more.
The sun broke out as we finished up the morning chores. Note to self and husband. The new/used skid steer did not impress me. Since hubby can't put the ice picks on both sides of the steel tracks, it doesn't have the traction it should. It made putting out large bales and fodder to the cattle very complicated.
I think New Holland designed their newer skid steers for comfort more than practical use. Well, at least for our place. Going up a steep icy hill with a huge bale is an issue. The old skid steer had no problems with it. I am not impressed.
With all the watering done, I made venison backstrap, eggs, and toast for an early brunch. Then I gathered my super light tripod and Olympus OMD E M5 camera and headed out with the intention of walking to the east end of the valley.
Intentions are sometimes a bit confusing. I got to the creek and changed my mind. I walked west and discovered some beautiful ice formations glistening in the sunlight.
Morris was not with me so I didn't have to keep an eye on him.
This is where Ariel had built a snow fort for Doe, Deer, and Fawn. I moved on and turned back towards the east with every intention of getting to the end of the valley.
However.
I stopped and spent quite a bit of time exploring the frost on the leaves and grasses in the creek bottom. Up on the ridge it was quite warm. In the creek it was much colder.
I then got sidetracked by the sandstone wall. The ice formations were growing.
I used a timed exposure so the snow and ice above the water would reflect... hopefully on the water.
It worked!
Then I thought, how could I take a photo of me doing some things I liked? The Oly had a remote but it has to be plugged into the camera. So I focused on the wall where I thought it would work and set the timer for 12 seconds.
After a few shots, I got what I wanted.
That worked out so well that I thought I'd set up another photo. This time an action shot.
I focused on a spot where I thought my boot would land and then set up the timer again for 12 seconds. I got it in 2 shots.
I edited all of the hike photos in ON1RAW2017. I have ON1 10.5 which is a dynamite program. The newer RAW program is still a bit 'buggy' but I really like it.
My 'concept' here was to look as if I were leaping from one 'world' into another. My thought is this. Go out to nature and leave the boring world of electronics behind and you will see the wonder of the natural world.
Well there you go. A fun concept even more fun trying to create it.
ON1 10.5 is the preferred method also of doing some heavy editing. Which I did in this self portrait from a few weeks ago.
The woods are in me...
Of course I got side tracked in exploring the frost and the creek in just a small area. I had to get back home as the sun was beginning to fade out of the deep valley.
It would soon be chore time again and time to make supper.
However, I managed to take a photo of Pete, the run away Morris Toy for the story I am working on. I managed to take a shot of Fawn for those kids who love to follow The Doe Story and headed back towards home. My fingers and toes were frozen.
So I leave you with a few shots I got on my New Year's Day hike.
Enjoy
Happy New Year.
Subscribe to:
Posts (Atom)