The Google+ group I belong to has us going out to collect a series of photos and combine them in something like a triptych.
You don't have to stick to 3 shots, it can be as many as you want.
I like to stick to three as it is easier in a way for me.
The processing should be equivalent in the photos. Meaning they should be the same in B&W.
What?
B&W can be different?
Sure it can. You can add effects that give it a sepia look, or a grainy look, or choose different processing techniques.
This occurs in 'your' computer lab and not in the dark room anymore.
I like experimenting with different looks.
The above shots were all done in color and that morning I took a walk after a very heavy fog had lifted and was entranced by the dewdrops on the oats.
Of course I was sure that I brought the wrong camera lens with me. A kit zoom lens that I'd bought years ago.
But I thought I could make the shots work. I was happy that I did.
These were shot in jpeg and then processed in PaintShopPro. I have an aversion to Adobe pushing me to use their products on line for a fee. I used Topaz BW Effects 2 to 'develop' the shots into B&W with Silver Paper Toning.
Side note, I'd like to try the NIK collection, but feel I can achieve much the same effects with Topaz Software which I've had for years.
I'd secretly like to have ALL plugins and programs, but then I'd constantly be wondering what to use!
My next series is supposed to be something current, or something I go out with purpose to find and shoot as a series.
Well being a 'creative' type I usually have trouble when I am told what to do in a creative sense.
So I thought I'd work on photos of a pea blossom from the garden.
They were so beautiful to photograph!
And then I got distracted...
Of course that wasn't the only thing I found beautiful.
There was a tomato blossom that caught my eye.
Oh ... and then I went riding and took my cheap plastic pink camera.
And I found the lane and the sky amazing from the view point of sitting in the saddle.
Oh wait.
I drove to town that morning and had my old Nikon D40 with me.
I stopped along the side of the road twice to take photos of the fields and sky.
It was amazing.
Then I just had to get a shot of the road that just ends in the sky...or appears to.
So without thinking I think I may have found my 'series' anyway.
The dark contrast in this last series was achieved by using the 'color filter' in Topaz B&W Effects. The color filter really can assist with getting a look you might want to achieve.
I'm not sure, but I think it is a toss up between the photos in the country lane or the photos of the skies with the road as the middle shot.
Now I know the road is not consistent with a theme, unless the theme that guides it is all about the cloud and sky.
Well that's my story and I'm stickin' to it.
I have to admit it. I like to collect skulls and antlers when I walk in the woods. I find them pretty fascinating and over the years I've gotten quite a collection.
I have bovine skulls, coyote skulls, 'possum, raccoon, and many deer skulls.
All of these bones and skulls have been discovered while hiking.
For my group on Fine Art Black and White photography, our assignment this week was on point of view or Depth of Focus.
I'd submitted a deer trail photo, then decided after seeing some 'still life' shots from other photographers that I'd try something inside.
[Good idea because it has been terribly cold here with wind chills in the -20's and below during the day. Not fun for a photographer and pretty rough on the equipment too.]
I'd seen some beautiful perfume bottles, flowers, and other macro work. But I am not a person who collects or has those things.
So I went out to my 'skull pile' and picked out some intact pieces to work with.
In the above shot, the left skull is raccoon, the middle is canine of some sort, and I am not sure what the right one is. Possibly a 'possum.
This was a great experiment with my Nikkor 40mm Micro/Macro lens and the Dolica TX570 tripod.
I used a piece of black velvet and my old wooden chair to set the items on.
See? You don't need an expensive set up to do some creative still life. There is the brick wall, the beat up chair, the wrinkled black velvet and Morris's crate all in the way.
Yet I was able to work around this set up and create these shots.
I used natural lighting that came in from the window.
I plan on trying to do some shots like this tonight and use another skull or two from my collection, but use an LED flashlight and a desktop lamp to see what I can do with 'creative' household lighting.
So being a 'bone collector' finally had some benefits.
I believe the temperature actually got to something like 8 degrees today. So after finishing up with the farm chores I decided to grab the snow shoes and trek down to the creek.
Once down there I wandered around looking to see what sort of changes had occurred since my last visit.
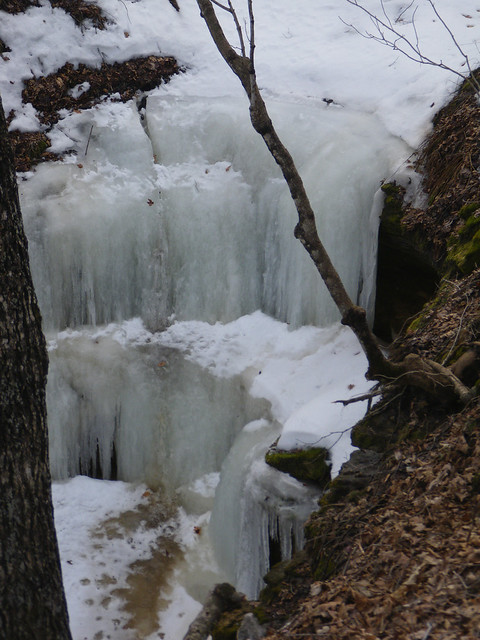
The ice wall was incredible.
Water seeps out of the limestone bank and slowly freezes in beautiful formations alongside the creek.
This is one of my favorite places to try and get some neat shots of ice.
Yeah.
I like ice.
Not the kind on the road that makes your car slip ice, cool ice shapes...ice.
The water was flowing fairly well IN the creek but frozen over in other places.
I set the snow shoes up against a tree and set up the tripod in the creek itself.
After about 40 minutes of messing around in the creek I noticed that my fingers were getting rather annoyingly cold.
So were my feet.
Obviously I was standing still for too long.
I picked up the snow shoes and hurriedly packed up the cameras putting them carefully away in the backpack and started hiking quickly along the creek bottom.
When I hit the trail that leads up and out of the valley, I stopped to put on the snow shoes.
Half way back to the ridge my fingers got warmed up and so did the toes.
I was anxious to see how some of my shots of the creek turned out.
Sad to say that I reviewed them and didn't care for them at all.
But the ice shots took the day and made it worth half frozen fingers and toes.
If the temps EVER get back above 10 degrees, I'm going to hike back to the ice cave.
Tomorrow? The high of 4?
Shot from about 3 years ago of the 'ice cave'.
Nope, doesn't look like I'll be taking my more sensitive equipment out.
But I could still go exploring in the valley out of the wind.
Or I could try some still life shots.
Heck, I never knew what a channel was before.
Never used that aspect of PS or CS as it is now called.
I figured I was doing great using Topaz plugin filters to get what I needed.
Along with Photomatix, Dynamic Photo HDR, and anything else I could get my hands on for processing...well,
Post processing.
I read a tutorial by Christopher O'Donnell on the use of luminosity layers. It is a hard concept to initially grasp but I decided to look up as many tuts as I could.
Obviously it has been around for quite some time. Tony Kuper has a good tutorial also.
I'm not one that will follow a tutorial to the letter. I usually open the program and start experimenting on my own.
Here is the original shot. Shot with a .9 ND filter. f22 at 8 seconds. I shot it at 400 ISO because it was so overcast.
The water appears as I wanted it to, but what could I do to make this 'better'?
I decided to try Topaz. This is what I always go to. Great plugins.
Well, more detail, more contrast, more color. I thought it was pretty darned good.
Then I decided to try some 'luminosity work'.
The Layers look like a mess right? But I started seeing a more true to life version of what I did shoot that day.
The whites are a bit blown in this shot and it was an overcast day. Perhaps if I'd shot in RAW format and converted it, ...it could be better.
Lastly I tried to convert it to Black and White using Topaz BW Effects.
I decided to have a bit of fun and go with a preset I had made on my own.
So there you go. Luminosity. Channels.
Things I had not studied before I joined the Google+ Community called 256SOG or Shades of Grey.
Just goes to show you.
You can always learn more things to try if you want to.